Friday, March 22, 2013

My Bible Cover

I finally made one! I've been wanting to make a cover for my bible for awhile now..I just couldn't find a good tutorial! I still didn't find one so I just winged it! Sorry I didn't make a tutorial myself to show you how, I kept adjusting and changing so much along the way that I don't even know the measurements I ended up using! ha! Oh well...

It's not perfect by any means, but I love it flaws and all! The best part is the strap has velcro so it holds all my pages together nicely! And the gray flower I added is a pin so I can take it  on and off or add different flowers to it! Cute?

Wednesday, March 20, 2013

Quilted Zipper Pouch!

Today I made THIS!! It's a quilted zipper pouch! It's originally supposed to be a pencil bag but I'm going to use it for lipgloss, mints, or cash in my purse (you know all the little stuff that falls to the bottom of your purse that you can never find)...It's great! I LOVE it! And it was super easy!! Don't let the zipper scare you! Believe me, if I can do it, you can too! The tutorial over at Sweet Verbana is awesome! Check her & her tutorial out HERE!! Be sure to check out her other projects, she makes the cutest things!

Thursday, March 14, 2013

Ruffle Zipper Pouch

Today I made this cute little zipper pouch! I LOVE ruffles so I added a ruffle across the front for extra cuteness! This was a challenge for me. This is the 3rd time I've made one and I'm still struggling! It's a pretty simple project but I have a tough time figuring out how to sew the zipper ends towards the end of the project. I think I'm going to keep trying until I get it ...eventually I will get it, right? Let's hope so! Despite its flaws, I still think it's adorable and zipper pouches are so useful! I can think of so many things I can use it for! It's great to stick all those little items you need in a purse/diaper bag that always seem to get lost at the bottom! This will fix that!
Try a ruffle pouch yourself!! I used the tutorial found HERE!! 

Also, have you ever looked at Pink Stitches blog? I LOVE it! She makes the cutest stuff! Check her tutorial out HERE!!


Wednesday, March 13, 2013

Today's Project: Owl Quilt & matching stuffy

My niece's birthday is coming up soon! She will be turning the big 3! She loves the color purple as well as loves owls! So when I found this fabric I knew I had to make her a little quilt! It's not finished yet, this is just the front... Think she will like it? I even made a little owl applique! It was so much fun! And the best part is I had left over fabric so I made her a.....

matching stuffed owl!!! Cute, right?!!

Tuesday, March 12, 2013

Quilted Table Runner

      Spring is so close I can taste it!! I can hardly wait for warmer weather! I'm so tired of snow & the cold and ready to go on nice walks with my little one! Easter is also going to be here before I know it! I don't have any decorations up yet for neither spring nor Easter so I decided to make a little spring craft and this is what I made! It's a quilted table runner! My table is small so I made the runner small, it's pry more like a place mat to be honest. But I love it! If you want to make one HERE is a good tutorial to follow! Mine isn't exactly like hers because I can't keep a straight line sewing so I purposely made mine look uneven! ha! I really like mine and may possibly make more! Maybe next time I'll do a round one to better fit my round table... 

 Thanks for stopping by!


Thursday, March 7, 2013

Easy Felt Flower Tutorial


Aren't these felt flowers adorable?! They are easy too!! I use them for a lot of different projects. I stick them on wreaths, headbands, hair clips, backpacks, hats, jars, frames, etc. I love these and wanted to share with you how to make them! All you need is:

*felt
*hot glue gun
*scissors 

Cut a strip of fabric. The length and width will vary depending on how large/small you want your flower as well as the length of the "stems". If you want a large flower then you need a longer strip of fabric. If you want the "stems" to be short and fat you need your width to be smaller. For longer thin stems you need a wider strip to cut thin stems. If that is confusing you I promise you will understand after we get through the directions. If it's still hazy, let me know and I'll explain more...Anyways, next:
Fold your strip in half. I like to put a small dab of hot glue at the bottom to hold it in place but its not entirely necessary. If you do decide to use glue to help hold it, but sure to put just a LITTLE bit for this part.
After you have your strip folded in half, cut small slits along the folded strip. **Be sure not to cut all the way and accidentally cut your strip in half!!! (Notice this flower I cut small fat slits, I will show you later what it would look like if you cut skinny thin slits)
Now that you have cut slits down the entire strip, it's time to roll!! Take the center and roll it around and around itself. The picture explains this best :) You can glue along the way but you don't need to because...


once you you have it all rolled up it should be flat on the bottom and look like this! Now is where you get your glue gun!
Generously apply hot glue to the back(bottom) of your flower!
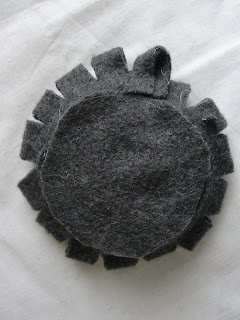
Add a round piece of felt to the back on top of all your hot glue.

And WHALA!! You have a cute little felt flower! 

Easy right?!! Now you can hot glue it on a cute tote bag, hat, frame, wreath, etc. Or add a pin/clip to the back to make it into a fashion accessory!

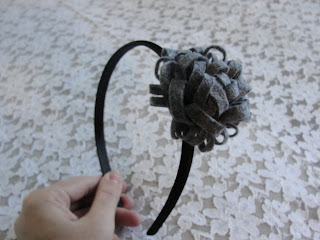
Also, I said I would show you what it would look like if you made your strip short & wider as well as cut long skinny slits.. I made this cute little headband!!

Or add it to a cute packaged gift!